Resizing Your Pics With iPhoto
First off, let me tell you that I am writing this article from the perspective of a photoshop user. Not everybody uses photoshop however and in this case I am attempting to solve the resizing issue with iPhoto users. This issue first came up when working with WordPress clients. When creating pages and posts, WordPress offers some basic options when it comes to photo sizing which generally work fine. Some other options of some themes use photos in specific areas of a theme (headers for example) that require specific pixel dimensions in order to display correctly.
I do my photo editing on a Mac but I have rarely used iPhoto. The first time I launched iPhoto I was more or less mystified, which is tough to admit for a long time Mac user. Number one, there is no Open item in the File menu?! I think that was the end of my first user experience with iPhoto. It was back to photoshop. Down the road I eventually ran into folks who needed some help with iPhoto. So, back to iPhoto. “Import to Library...” is the File menu item that gets your pics into iPhoto. The next logical step was to click Edit (bottom right toolbar in the iPhoto window).

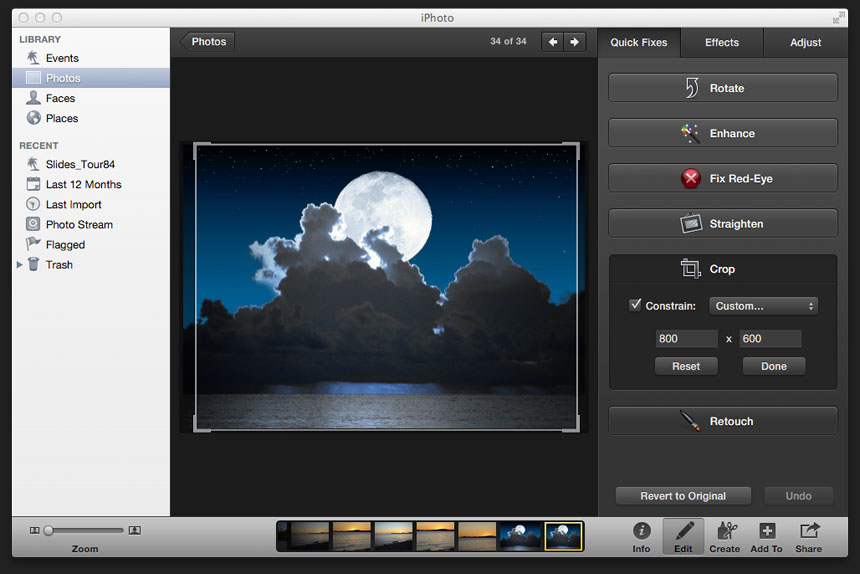
This window offers a crop button. Clicking this button reveals a drop-down box with a “Custom...” option. Here you can enter the target dimensions of the picture you will eventually want to upload. Click “Done” and go back to your Photo window. In the test I did for this procedure, I tried an 800 X 600 crop. When I clicked the Info button I saw that my pixel dimensions were much larger than 800 X 600. I checked the original file and saw there was no crop made at all. The 800 X 600 specification does not refer to pixels but aspect ratio only, and all the editing you perform in iPhoto is stored only in the iPhoto library. For the resizing process, you should still use your target pixel dimensions in the crop window just to keep the process simple.
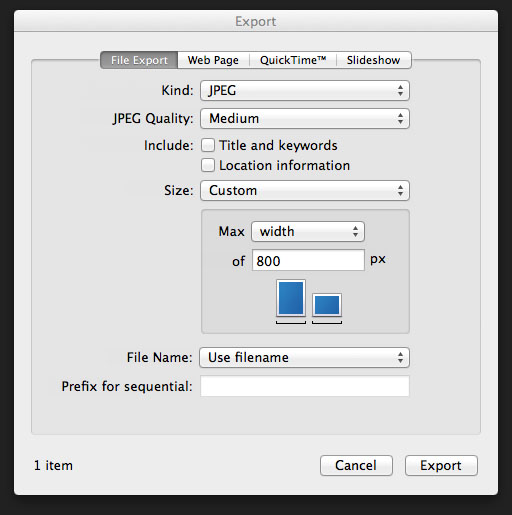
We can still end up with the proper dimensions in our file but there is one more step. You need to to select “Export...” from the file menu. You can choose File Export. Now you can select JPEG, choose your quality (try medium) and your size. Choosing “Custom” for your size allows you to specify a maximum dimension. For the 800 X 600 example I could set my maximum width to 800px. The resulting image would be 800 px X 600 px. Now you can name the file anything you like, store it any any folder and upload it from your WordPress admin panel.

Developing this procedure revealed some interesting things about iPhoto. The original file is stored in the library and you can always revert to that after doing any editing. When you import your photos directly from your camera into iPhoto, you can’t directly access them in the Finder. You can navigate to the iPhoto library in the Finder but all you will see is the iPhoto library icon. The idea is that if you want to search and navigate through Photos on your Mac, you use iPhoto. This setup doesn’t really work for photoshop users. (Try dragging and dropping a picture into photoshop, make some changes and save the file.) So photoshop users are stuck with either the Finder or using something like Adobe Bridge. For the vast majority of photographers, iPhoto has everything you need from basic editing to printing and sharing your pics, so you should never need to use the Finder.
